Introduction
Recently, I started working on quite interesting project. One of its elements is micro-location inside the building based on WiFi Access Points. Company’s buildings have a lot of Access Points in different locations like regular rooms, conference rooms, corridors, sports building and restaurant. Having pool of Access Points with their names, locations and MAC addresses (or more precisely: BSSID) it’s possible to create micro-location for Android mobile devices.
Overview
On the image below, you can see approximate location of WiFi Access Points in the F3 building of Future Processing company. Other buildings also have their own Access Points, but they weren’t taken into consideration during the initial experiment. Android gives us possibility to scan available WiFi Access Points and measure their signal strength. Appropriate BroadcastReceiver allows us to react on event of changing WiFi Access Points signal strength, what can be interpreted as movement of person having mobile device. When such event occurs, we can read list of available Access Points, measure their signal strength, detect Access Point with the strongest signal, map it to specific room location and start WiFi scan again in order to retrieve fresh list of the Access Points as soon as possible. We have to remember that WiFi scanning is an asynchronous operation, so we don’t know, when we receive the results. That’s why event-driven development is good approach in such case. We can use pure Android BroadcastReceiver or use Otto Event Bus to make our code annotation-based, fine-grained and clear.
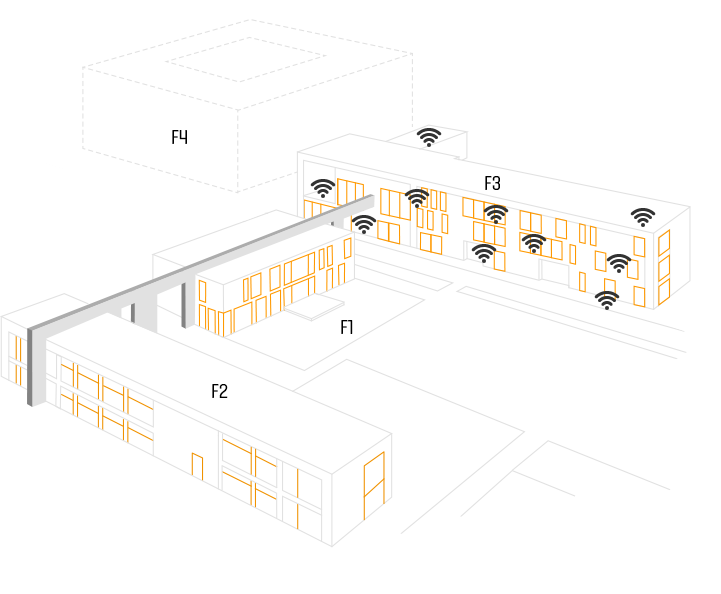
Original image comes from www.future-processing.com website.
Implementation
To implement micro-location I used open-source NetworkEvents Android library, which I have written earlier and described in one of my previous blog posts. First, we should create AccessPoint model.
public class AccessPoint {
    private String mac;
    private String keyName;
    private String fineName;

    public AccessPoint() {
    }

    public AccessPoint(String mac, String keyName, String fineName) {
        this.mac = mac;
        this.keyName = keyName;
        this.fineName = fineName;
    }

    public String getMac() {
        return mac;
    }

    public String getKeyName() {
        return keyName;
    }

    public String getFineName() {
        return fineName;
    }
}
AccessPoint class can cotain mac address of the particular Access Point, keyName as additional identifier of the Access Point location and fineName containing readable name of the Access Point location, which can be displayed for the user. After that, we have to create RoomLocator class. This class contains getNearestAccessPoint() method, which reads list of the available Access Points and returns one with the strongest signal. We have to remember, that we have to fill accessPointsRoomList HashMap with our map of the Access Points. In this case, MAC address of the Access Point, which is String value, should be treated as a key in the HashMap.
public class RoomLocator {
    private static Map<String, AccessPoint> accessPointsRoomList = new HashMap<>();

    public AccessPoint getNearestAccessPoint() {
        WifiManager wifiManager = (WifiManager) context.getSystemService(Context.WIFI_SERVICE);
        List<ScanResult> accessPointsScanResult = wifiManager.getScanResults();
        AccessPoint nearestAccessPoint = null;
        ScanResult bestSignal = null;
        String currentNearestBSSID;

        for (ScanResult scanResult : accessPointsScanResult) {
            currentNearestBSSID = scanResult.BSSID.toUpperCase();

            if (!accessPointsRoomList.containsKey(currentNearestBSSID)) {
                continue;
            }

            if (bestSignal == null || WifiManager.compareSignalLevel(bestSignal.level, scanResult.level) < 0) {
                nearestAccessPoint = accessPointsRoomList.get(currentNearestBSSID);
                bestSignal = scanResult;
            }
        }

        return nearestAccessPoint;
    }
}
After that, we can use NetworkEvents to listen, when signal strength of the Access Points is being changed. This usually happens, when user is moving with the smartphone. We can do that very easily with @Subscribe annotation. When mentioned event occurs, we can call getNearestAccessPoint() method from RoomLocator class. Of course, we can create provider for this class and access it in static way. In addition, please read my previous post about Network Events library if you want to know, how to use it properly.
@Subscribe
public void wifiAccessPointsRefreshed(WifiAccessPointsSignalStrengthChangedEvent event) {
   AccessPoint accessPoint = new RoomLocator().getNearestAccessPoint();
   Toast.makeText(this, accessPoint.getFineName(), Toast.LENGTH_SHORT).show();
}
That’s it. Every time, when WifiAccessPointsSignalStrengthChangedEvent will occur, you will get fresh information about Access Point with the strongest signal, which can be treated as your location. I’ve tested this solution and it actually works. Please remember that such application can work only in buildings with many different Access Points in different rooms on different floors (usually in IT companies).